In a previous article, I introduced some simple catch basins and their applications in yard and residential roof downspout drainage. Products by National Diversified Sales (NDS) were presented. In this article, we will look at downspout catch basin installation and highlight two square NDS catch basins.
Catch Basins and Water Quality
It is common for homeowners to put their downspout water into a pipe that then travels out to the street or a back yard location. This often leads to clogged drainage pipes because leaves, sticks and sand particulate from roofing shingles build up in the pipe to gradually reduce drainage efficiency. I like to think of a catch basin as the “first line of defense” in cleaning up rain water and preventing clogged drainage pipes. A catch basin helps to reduce downspout drainage problems in two ways. First, the grating that covers the basin filters out coarse debris that finds its way through the downspout. The grate “catches” the biggest contributing factor to clogged drain pipes before it enters the catch basin.
The second way of cleaning the water is the catch basin sump where finer particles that pass the grating are “caught.” The sump is a small water reserve that is just below the exit pipe (invert out) of the basin. As suspended particles are first entering the catch basin, they must pass a swimming test. If they are able to enter the sump portion of the basin and “float with the current” to the exit pipe, they win. If they are too heavy or the water is too slow, they will sink to the bottom of the sump and be left there for later removal. The particles that generally “pass” the sump test are light organics and fine silt and clay sized. The particles that get trapped in the catch basin’s sump need to be cleaned out periodically. (So, check your sumps!!) Also, the deeper or wider the sump, the more difficult it will be for the particle to “swim” to the exit pipe.
Catch Basin Installation
That’s the theory. Let’s talk about installation. I’m going to show two methods to install catch basin drains in concrete: the Single pour and the Double pour methods. I always like to place drainage products in concrete because of a number of reasons.
- It adds strength to the trench drain or catch basin, especially if the drain system is made of plastic,
- It anchors the drainage product to the ground and reduces “floating”,
- I like the look of a concrete apron around the drain and feel that it helps direct the water to the drain,
- And lastly, I like working with concrete.
Single Pour Method
 The Single pour installation method involves setting a catch basin in a form and making a single concrete pour to form the casing. For demonstration purposes, I’m using an NDS 900 catch basin with a single outlet. The 900 series catch basin is a 9” x 9” basin with a built in 2 inch sump. When you order this basin, you need to know what pipe size you are using to evacuate the water because you will have to order a pipe adapter to insert into the outlet of the basin. (Note: all larger NDS catch basins will have this feature.)
For this installation, I had a pre-existing drainage pipe connected to the downspout; it was clear of debris and exited on the side on a hill, so this was a preemptive strike on my part. I first dug a hole at the base of the downspout. The hole was large enough and deep enough to accommodate the basin and a 3 inch border around the basin.
The next step requires setting the catch basin, connecting the pipe to the drain outlet and building a wooden mold that will form the concrete casing. I was sloppy with this installation. I admit it. Normally, my work has symmetry. In this case, I never centered the basin properly within the mold. But, you will see soon that this can be made to look good.
 You can see that I used metal “pins” (or spikes) that were hammered into the ground which hold the wooden form into place. The pins have holes in them which allow me to hammer nails through them and into the wooden form. This is how the mold is held rigid against the earth. Also, the inside of the mold was lubricated with an oil to help in the release of the mold from the hardened concrete. Many products are available on the market to provide this release. However, an oil and kerosene mixture will work, as well as, plain ol’ Vaseline.
Pouring the concrete in the mold is the next step. I used a 50 pound sack of concrete purchased from a local home improvement store. After mixing to the proper consistency, I placed the concrete in the mold and used a metal rod to poke the wet mixture and ensure that air bubbles were not trapped. I want to point out here that I didn’t have concrete under the catch basin. I actually had a large stone. The purpose of the concrete was to provide a “shell” around the catch basin which could provide additional drainage surface for downspout water to collect prior to entering the basin.
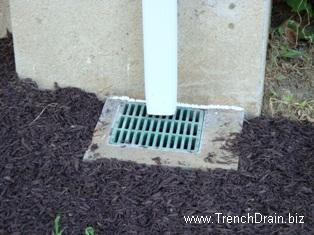
 After I let the concrete set over night, I stripped the mold and trimmed away all the tramp rock, dirt and wood to leave behind a clean, crisp concrete cube. I want to point out here that I centered the drain under the downspout. And, because the downspout pipe was so close to the wall, I opted to rest the catch basin against the house. I could have put a curved spout on the downspout and brought the catch basin 3 inches away from the wall but decided to keep the downspout as-is. If I’d gone that route, there would have been a concrete section between the house and the catch basin. It could have been perfectly symmetrical! (I should have done that.)
I put a bead of caulking between the wall and the concrete casing to keep water away from that spot. One of the major causes of basement leaks is ground-foundation joints just like this one. Unfinished joints provide an entry point for moisture that causes foundation damage over time. A common solution is a catch basin or trench drain system installed along the water saturated point, but you should always seal the foundation anyway.
Next, I made it look purdy! I packed clean soil around the concrete and added a little downspout extension to accurately direct the water. And, I mulched the area. Doesn’t it look nice? Despite the poor symmetry of the concrete, it looks charming. Even so, I learned from this experience and I will do a better job on the next installation.

Double Pour Method
The double pour catch basin installation method utilizes two concrete pours to set the drain. The first pour is made around the sump basin to stabilize it; the second pour, made after the first has hardened, is to complete construction of the larger drainage surface.
 The double pour method is generally used when you are placing the drain within a large open area or within a larger form. For instance, if you are making a new concrete driveway, there will be forms defining the edges of the driveway. It would be unnecessary to build a perimeter form around your catch basin or driveway trench drain. You would merely set your drain in a location at an elevation that would facilitate the drainage of the driveway. After setting up the drain pipes and any structural steel, the whole driveway would be poured at the same time.
However, a catch basin will try to rise out of the wet concrete like a boat on water. Lightweight objects will become buoyant and sway or float during concrete placement if not locked down beforehand. A small amount of concrete poured at the base of the drain will provide the stability needed for the final pour. And prior to drying, the elevation and alignment can be “fine tuned” in preparation of the final pour.
 In the example that follows, I used a 12” x 12” catch basin made by NDS. This product, NGB1200, is promoted as the Next Generation Basin. Its walls are constructed in a manner which allows you to adjust the depth of the sump area at the base of the basin. Walls are constructed either with an invert opening or with a solid wall. The following picture shows installing and trimming a solid wall section of the basin.
For this installation, I decided to have a shallow sump on the catch basin. When installing the open invert wall section, I trimmed the section to give only a 1” deep sump and attach a pipe adapter to fit my 4” S&D pipe. This NDS fitting (#1243) locked into the side of the open basin wall.
The overall project called for a new sidewalk that ran adjacent to an existing driveway. Here, the downspout drained into the yard, which sloped so that water ran across the driveway and into the street. While pouring concrete for the sidewalk, we decided to add a catch basin to prevent further downspout issues. The basin was installed at the base of the downspout and was flanked by the driveway and garage foundation.
 A hole was prepared to the proper depth. Next, a small amount of concrete was placed in the hole. The catch basin was set in the hole and filled with stones to help keep it from floating. More concrete was poured around the basin to ensure that it would be locked into place once dried. While the concrete was still wet, the basin was adjusted to the proper elevation and symmetry with the driveway and house.
After the first pour had hardened, it was time to pour the sidewalk. The stones that were originally put in the catch basin to stabilize it were left in place during the second pour. Once the sidewalk had been poured and was dry enough to walk on, the stones were removed and the catch basin was cleaned of stray concrete. As a final touch, I added a decorative cast iron “Sun Grate” by Iron Age Designs to complete the project.

Final Notes
Catch Basin sizes and styles vary with application and drainage requirements. Residential catch basins range in size from 6” diameter garden drains to 24” x 24” yard drains and offer a wide variety of grating options. Plastic, brass, cast iron and chrome grates are designed to meet the cost or aesthetic requirements of your residential drainage project.
Trench Drain Systems is an authorized dealer for NDS drainage products and can offer advice in making catch basin selections. We carry Iron Age decorative grating products, which fit many of the NDS drainage systems. Contact at 610-638-1221 or email Sales for assistance on your project.
Pingback: PlasticTrenchDrain.com » The Catch Basin Medley: Know Your Options
Pingback: PlasticTrenchDrain.com » Patio and Driveway Drainage Solutions – Low Profile Drain (Part 1)